9. Troubleshooting
The following is a list of symptoms for common problems and instructions for resolving them. If the suggested steps do not solve the problem, please contact Wildlife Acoustics Support for further assistance (see Contact Wildlife Acoustics Support).
If your Song Meter Micro 2 appears to be unresponsive, there are a few things you should check to confirm the cause and try some common solutions:
Check that all installed batteries are brand-new or freshly charged and properly installed.
The AA battery tray can have a very tight fit. It is possible for a battery to be held in place by the tray without contacting the positive contact. Ensure each battery is in contact with both the spring on the negative end and the metal contact on the positive end.
Check that the switch is in the position.
Press the button and check if any of the LEDs light up.
If any of the LEDs light up in response to your button presses, then the recorder is receiving power. Attempt to pair the recorder with the Song Meter Configurator app (see Pair the Recorder with the Song Meter Configurator App). If your recorder is not displayed in the app's Recorders screen, see App Not Receiving Status Updates.
If none of the LEDs light up at all, your Song Meter Micro 2 may need repair. Contact Wildlife Acoustics Support for further assistance (see Contact Wildlife Acoustics Support).
If your Song Meter Micro 2 does not appear in the Song Meter Configurator app's Recorders screen, or if the app is not receiving status updates from the recorder several times per minute, there are several possible causes to check.
Confirm that the Song Meter Micro 2 is powered on and that pressing the button causes one or more of the LEDs to light up.
See Recorder Not Turning On for more information.
Note
If the installed batteries are mostly drained, it is possible for the recorder to have enough power to show LED activity, but not enough power to communicate over Bluetooth.
Make sure all installed batteries are in good condition.
Enable Bluetooth® in your mobile device's settings.
On iOS or Android, open the Settings app and select the Bluetooth page to turn Bluetooth on or off.
If using an Android device, ensure that Location is turned on in your device's settings.
See this Google support article for instructions on how to turn on Location.
Make sure the Song Meter Configurator app has been granted all requested permissions.
On iOS:
Open the Settings app.
Tap the Song Meter entry to open the settings page for the Song Meter app. Permissions can be toggled from this page.
On Android:
Open the Settings app.
Tap Apps.
Tap on the Song Meter app entry.
Tap Permissions.
Enable all permissions on this page.
Important
On some devices, GPS and Bluetooth connections are handled by the same hardware component, so the Song Meter app must have access to Location permissions in order to use Bluetooth.
If you are able to pair with the recorder, check whether the Send Bluetooth beacons? setting is enabled. If this setting is disabled, the Song Meter Micro 2 will not update its status in the Song Meter Configurator app unless the recorder and app are paired.
If the recorder does appear in the Recorders screen with an up-to-date status, but you are unable to pair with and configure the recorder, see Unable to Pair App with Recorder.
If the recorder still does not appear in the Recorders screen, or if the app does not receive updated status information from the recorder, your Song Meter Micro 2 may need repair. Contact Wildlife Acoustics Support for further troubleshooting assistance and to arrange a repair if necessary (see Contact Wildlife Acoustics Support).
If you are unable to pair the Song Meter Configurator app with the Song Meter Micro 2, first check the following:
Confirm that the Song Meter Micro 2 is powered on and that pressing the button causes one or more of the LEDs to light up.
See Recorder Not Turning On for more information.
Note
If the installed batteries are mostly drained, it is possible for the recorder to have enough power to show LED activity, but not enough power to communicate over Bluetooth.
Make sure all installed batteries are in good condition.
Confirm that the Song Meter Micro 2 appears in the app's Recorders screen and that the app is receiving status updates from the recorder several times per minute.
See App Not Receiving Status Updates if this is not the case.
If the Song Meter Micro 2 is powered on with fresh batteries and sending regular status updates to the Song Meter Configurator app, but the pairing process consistently fails, proceed with the following steps:
If using single-use batteries, make sure they are brand new. If using rechargeable batteries, make sure they have been recently charged to full capacity.
On the Recorders screen, tap the Status icon for the recorder to open the Status screen.
Under the BATTERY LEVEL label, set the %/V toggle switch to V.
Check that the voltage level is sufficiently high. Below are approximate voltage readings for new or fully charged batteries of several common types.
AA Alkaline: 6.4 V
AA NiMH: 5.8 V
AA Energizer® Ultimate LithiumTM: 6.7 V
If new or fully charged batteries consistently read significantly lower than these values, contact Wildlife Acoustics Support for help diagnosing possible issues with your batteries or the Song Meter Micro 2. See Contact Wildlife Acoustics Support.
Check the value of the FIRMWARE VERSION listed at the bottom of the Status screen. Make sure the listed version matches the latest version on wildlifeacoustics.com (see Download Firmware Updates). If it does not, see Load a Configuration to a Paired Recorder from an SD Card.
If you are still unable to pair with your Song Meter Micro 2 after following these steps, your recorder may require repair. Contact Wildlife Acoustics Support for further troubleshooting assistance and to arrange a repair, if necessary (see Contact Wildlife Acoustics Support).
These error messages might appear on a recorder's Status screen, in the STORAGE INFO panel.
NO SD CARD: No card is detected.
SD CARD FULL: Card is detected but full.
SD CARD ERROR: Card is detected but not working.
SD CARD BAD FORMAT: Card format is not recognized or is corrupted.
SD CARD DIRTY: Card was interrupted in the middle of recording, and the recorder cannot write to the card until this status is cleared.
See SD Card Dirty below for more details.
General SD Card Troubleshooting Tips
If you encounter any issue with an SD card, backing up any important data and then reformatting the card is what we recommend doing first.
If you know the card does not hold any data that you need to save, reformat the card (see Format the SD Card).
Formatting the card erases all data from the card and resets it to a blank state. We recommend formatting the card prior to each deployment to avoid common card errors during recording.
If the card may contain data that you need, such as recordings from a deployment that just finished, connect the card to a computer. If you are able to access the data, copy the data to another location (such as your computer's internal drive), and then reformat the card (see Format the SD Card).
Always be sure to properly eject the card from your computer's operating system before physically removing the card from your computer. Failing to eject the card according to these instructions can cause the Song Meter Micro 2 to display error messages.
On Windows, refer to this Microsoft support article on safely removing hardware (including SD cards).
On MacOS, refer to this Apple support article on ejecting SD cards.
If this error message is displayed, check that the SD card is fully inserted into the Song Meter Micro 2's card slot. To properly engage the slot's spring mechanism, press the card fully into the slot to insert it, then press it again, and the spring will eject the card from the slot.
If the error message persists, try using a different card with the same recorder, or the same card with a different recorder, if you have multiple. Doing so will help determine whether there's an underlying issue with the card or with the Song Meter Micro 2's SD card slot.
This message means there is not enough available space on the card for the Song Meter Micro 2 to save any more audio files to the card.
If this message is displayed even though the card appears to not be full when viewed from a computer, it may mean the card was not properly formatted since the last time it was used.
If you delete files on your computer by moving them to the Trash or Recycling Bin but do not reformat the card, the structure of the card is still affected by the deleted files, and the Song Meter Micro 2 will be unable to use that space. Formatting the SD card both deletes all files and resets the structure of the card.
This message could indicate a number of different kinds of card errors. As a first step, refer to the General SD Card Troubleshooting Tips. Check to see if a computer also displays an error message when you try to view the contents of the card, as this may indicate an issue with the card itself.
If multiple different SD cards consistently display this error message on one particular Song Meter Micro 2, but not on other recorders or computers, it may indicate a problem with the Song Meter Micro 2 itself. Contact Wildlife Acoustics Support for further assistance diagnosing the issue (see Contact Wildlife Acoustics Support).
This indicates that the card is not formatted correctly. The Song Meter Micro 2 expects cards to have one of two particular file systems, depending on the size of the card:
For SDHC cards, which range in size from 4 GB to 32 GB, the file system must be FAT32.
For SDXC cards, which range in size from 64 GB to 2 TB, the file system must be exFAT.
Whenever the Song Meter Micro 2 formats a card (see Format the SD Card), it applies the file system listed above for the size of the SD card. However, it is possible to apply other file systems to SD cards that don't match these conventions using software formatting tools on a computer.
For example, it is possible to apply FAT32 formatting to a card larger than 32 GB. Doing so is not recommended, and it will cause this error message to appear and prevent the Song Meter Micro 2 from using the card. In some cases, it can even cause errors that persist after the Song Meter Micro 2 attempts to reformat the card.
If an SD card has been formatted to a file system that does not match the conventions listed above, use the SD Association's free formatting tool to apply a "Quick Format" to the card.
This error message generally appears after the Song Meter Micro 2 was interrupted in the middle of writing to the SD card. The most common cause of this message, by far, is that the recorder's batteries reached the very end of their lifespan, and the recorder lost power.
Important
In the vast majority of cases, the "SD Card Dirty" message does not indicate a serious or unusual issue with the SD card or the Song Meter Micro 2, nor does it indicate the loss of data recorded before the error occurred.
Clearing the dirty bit is generally as simple as connecting the card to a MacOS or Windows computer, then ejecting the card before removing it (see General SD Card Troubleshooting Tips). Reformatting the card will also clear the dirty bit, but make sure you back up any data from the card to your computer first!
The SD card being labeled as "dirty" refers to a safety mechanism called a "dirty bit" used by SD cards and other data storage systems. If the Song Meter Micro 2 loses power or its connection to the SD card in the middle of certain operations, the "dirty bit" serves as a marker of that interruption.
Continuing to write data to a card that was interrupted in the middle of this kind of operation could lead to corruption that might affect all data previously saved to the card. When the Song Meter Micro 2 detects that the SD card is marked with a dirty bit, it will cease writing to the card in order to prevent serious data corruption. Any data saved to the card before the dirty bit was raised will be retained.
The Song Meter Micro 2 can be reset to its factory default settings. This does not reset the recorder's internal clock, but it does reset its time zone setting to Coordinated Universal Time (UTC).
See Settings Reference for a description of each setting and its default value.
The default location setting is 0° latitude and 0° longitude, and the default time zone is UTC + 00:00, equivalent to Greenwich Mean Time (GMT).
The default schedule is the preset Record birds/frogs 24 hours a day.
Restore Factory Defaults Using the Song Meter Configurator App
To restore factory default settings on a paired recorder using the Song Meter Configurator app:
Install brand-new or freshly charged batteries into the Song Meter Micro 2.
In the Song Meter Configurator app, open the Utilities menu:
Pair the Recorder with the Song Meter Configurator App.
Configure and Unpair icons will appear next to the recorder's name.
Tap the Configure icon for the paired Song Meter Micro 2 in the Recorders screen.
Tap the Utilities icon in the upper-right corner of the Configuration Editor.
In the Utilities menu, tap Restore factory defaults.
A confirmation message will as if you are sure you want to restore default settings.
Tap OK to confirm.
A RESETTING activity indicator will appear, followed by a confirmation message.
The Song Meter Micro 2 can generate diagnostics files that record the results of internal tests as well as a log of the recorder's internal processes before the diagnostics file was generated. Diagnostics files are generated automatically when the recorder experiences a reboot, and they can also be generated manually.
Note
Diagnostics files that have been generated automatically do not necessarily indicate a serious issue with the recorder. See Diagnostics Files for a description of common causes for automatic diagnostics files that are not related to hardware malfunction.
In general, we recommend only sending a diagnostics file to Wildlife Acoustics Support if a support representative requests it. A diagnostics file by itself is not enough to identify issues you may be experiencing with your recorder; your own description of the problem is the best place to start. A support representative may ask to see a diagnostics file once they understand the context of the issue. See Contact Wildlife Acoustics Support.
Using the Song Meter Configurator app, it is possible to generate a diagnostics file from a paired Song Meter Micro 2 and send it Wildlife Acoustics Support via email.
Note
You must have your mobile device's built-in email application properly configured in order to send a diagnostics file using this method.
Install brand-new or freshly charged batteries into the Song Meter Micro 2.
In the Song Meter Configurator app, open the Utilities menu:
Pair the Recorder with the Song Meter Configurator App.
Configure and Unpair icons will appear next to the recorder's name.
Tap the Configure icon for the paired Song Meter Micro 2 in the Recorders screen.
Tap the Utilities icon in the upper-right corner of the Configuration Editor.
In the Utilities menu, tap Email diagnostics to Wildlife Acoustics.
A Loading... activity indicator appears onscreen, and the recorder's LED will flash green. This typically lasts over 30 seconds.
Your mobile device's email interface will generate a new message addressed to
support2024@wildlifeacoustics.comwith the diagnostics file attached.In the message addressed to Wildlife Acoustics Support, add a message to provide context to the diagnostics file. What problems are you experiencing with the recorder? What troubleshooting steps have you already attempted (see Troubleshooting)?
If the diagnostics file is related to an ongoing case with Wildlife Acoustics Support, add the Case Number to the subject line of the message.
Tap Send.
Testing the Internal Microphone
In between deployments, we recommend performing a basic test to confirm that the Song Meter Micro 2's built-in microphone is working correctly. Unlike other Song Meter models, the Song Meter Micro 2's microphone is not compatible with typical microphone calibration signal generators, which are usually designed for cylindrical microphones. However, it is possible to perform a basic check of the microphone's sensitivity.
Not Intended for Precise Noise Measurement
The Song Meter Micro 2 is not intended for recording applications that require consistent, known signal levels. For example, when monitoring the absolute value of ambient noise levels, the accuracy of those measurements depends on knowing the precise sensitivity of the microphone. In this situation, we recommend a recorder whose microphones can be accurately measured using a calibrated signal generator. Other Song Meter models with cylindrical microphones fall into this category.
One way to test the internal microphone of the Song Meter Micro 2 is to make a recording of someone speaking, then listen back to the recording on a computer to verify that the voice was recorded reasonably clearly.
Insert a microSD card into the recorder's microSD card slot.
Pair the Recorder with the Song Meter Configurator App.
Configure and Unpair icons will appear next to the recorder's name.
Tap the Configure icon for the paired Song Meter Micro 2 in the Recorders screen.
Change the recorder's settings to values appropriate for this test.
Change the Sample rate to 44100 Hz or 48000 Hz.
Lower sample rates are unable to record the highest-frequency components of the human voice and can cause the test recording to sound muffled.
Change the Gain setting to 6 dB.
With higher gain settings, speaking close to the microphone at typical volume can result in a distorted recording, making it difficult to gauge microphone condition.
Select the preset schedule Record birds/frogs 24 hours a day.
Ten seconds after your last settings change, the LED will begin blinking green to indicate the Song Meter Micro 2 is recording.
Make a test recording.
When the LED begins blinking green, hold the Song Meter Micro 2 approximately one meter from your mouth, with the vent facing you.
In a quiet environment, speak clearly at a normal volume. Just a few words is enough.
Set the switch to before removing the microSD card.
Listen to the test recording.
Connect the microSD card to a computer.
Open the recording in an audio playback program.
The recorded voice should be clear and intelligible.
If the voice sounds distorted, make sure the Gain on the Song Meter Micro 2 is set to 6 dB, and that the recorder was held at least one meter from the person's mouth. Sounds that are too close, too loud, or recorded with the Gain set too high will create distorted recordings.
If the voice sounds muffled, make sure the vent on the front lid is unobstructed, and make sure the Sample rate is set to 44100 Hz or 48000 Hz.
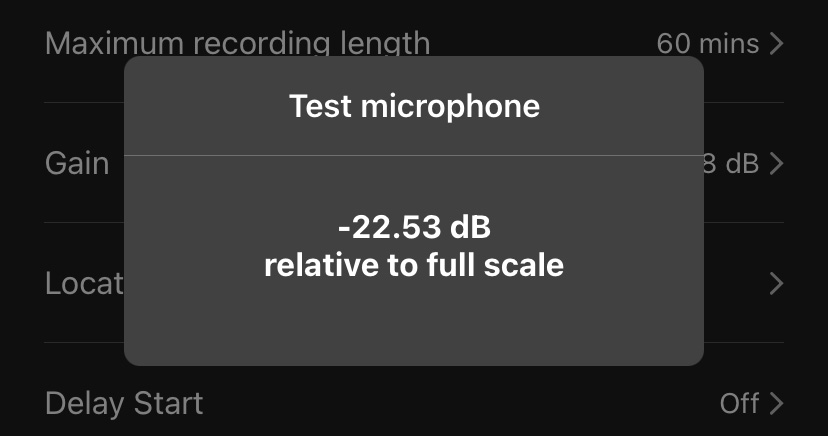
This test involves using a device like a computer or smart phone to generate a 1 kHz sine wave. The Song Meter Configurator can provide a numerical readout of the incoming signal level.
These instructions assume you understand basic concepts related to acoustics and recording equipment. Testing the microphone by making a test recording and subjectively assessing the recording quality is sufficient for a basic test (see Test the Internal Microphone Using an Example Recording ).
Limitations of this Test
The volume of the computer or smart phone speaker, its distance from the Song Meter Micro 2, and the orientation of each device will all have dramatic effects of the value of this readout. If these factors are not kept consistent, the results of two tests cannot be meaningfully compared to each other.
This test, by itself, cannot serve as an accurate measurement of an individual microphone's sensitivity. At best, it can serve to compare the sensitivity of two Song Meter Micro 2 recorders. To perform even a basic comparison, two Song Meter Micro 2 recorders must be tested with a speaker set to the same volume with exactly the same distance and orientation between the recorder and speaker.
Configure a computer or smart phone to play a 1 kHz sine wave from its speakers.
Make sure all factors that could affect the output level of the sine wave are kept consistent between tests.
Position the Song Meter Micro 2 approximately one foot from the speakers.
If testing multiple recorders, place each recorder in the same position with the same orientation for each test.
In the Song Meter Configurator app, open the Utilities menu:
Pair the Recorder with the Song Meter Configurator App.
Configure and Unpair icons will appear next to the recorder's name.
Tap the Configure icon for the paired Song Meter Micro 2 in the Recorders screen.
Tap the Utilities icon in the upper-right corner of the Configuration Editor.
Tap Test Microphone.
A Test Microphone window will appear.
This window shows a numerical readout of the incoming signal level, bandpass-filtered to 1 kHz, in dBFS.
Quiet all nearby sounds except for the device playing the test tone.
Play a 1 kHz sine wave.
When the Test Microphone reading settles, record the measurement.